

Installing a driveway gate is one of the most effective ways to enhance your home’s privacy, boost security, and increase curb appeal — especially in Orange County, where gated properties and modern aluminum fencing are extremely popular. Whether you’re upgrading your existing fence or installing a brand-new entry system, a driveway gate can dramatically improve the look and function of your home. This guide walks you through exactly how to install a driveway gate step-by-step, including the tools you’ll need, materials to buy, common mistakes to avoid, and answers to the most frequently asked homeowner questions.
If you’re unsure about tackling this project yourself, many homeowners begin their search with “aluminum fence installation near me” to locate trusted Orange County contractors. But if you’re ready to take on a DIY challenge, this guide will help you complete the installation safely and confidently.
Tools Required for Driveway Gate Installation
Before starting your project, make sure you have all essential tools on hand. A driveway gate installation requires a balance of precision and strength, so using the right tools is important for long-lasting results. You will need a post hole digger or auger to create stable footings, a reliable level to ensure both the posts and gate sit perfectly straight, a tape measure, socket wrench set, drill with appropriate bits, a concrete mixing bucket or wheelbarrow, and a shovel. Safety gear like gloves and protective glasses is also strongly recommended.
Many homeowners wonder, “Can I install a driveway gate with basic tools?” The answer is yes — as long as you have a level and a digging tool. However, having proper hardware and a strong drill will make the process smoother and more accurate.
Materials You’ll Need for Installation
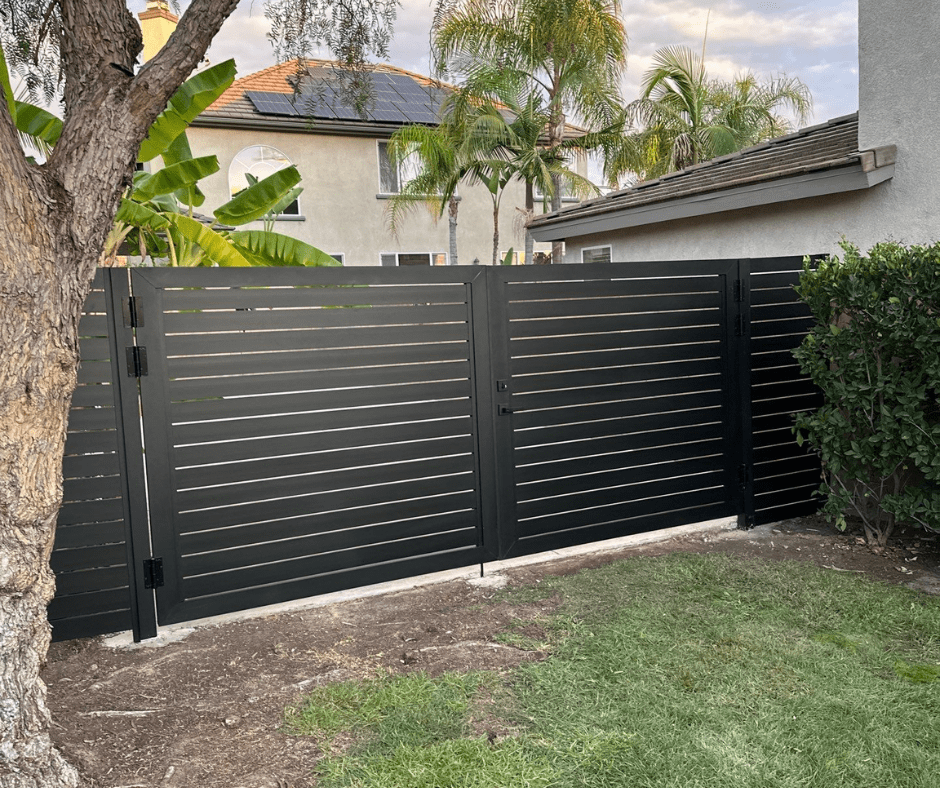
Your material list will vary depending on the type of gate you’re installing, but for most Orange County homes, the essentials include gate panels (often aluminum, steel, or wood), sturdy posts, high-quality hinges, mounting brackets, concrete bags, and optionally, an automatic gate opener kit. If your driveway gate will connect to an existing aluminum fence, make sure the posts are compatible with the new gate weight.
If you’re installing an aluminum driveway gate — a popular choice in coastal areas due to its rust-resistant nature — you may also want to search “aluminum fence installation near me” for contractors who supply matching materials. Many homeowners also ask, “Can I attach a driveway gate to an existing aluminum fence?” Yes, you can, as long as the existing posts are reinforced or replaced with new concrete-set posts.
Time, Difficulty & Cost Overview
Most homeowners can install a manual driveway gate in 4–8 hours, not counting concrete curing time. Automatic gates take longer because of wiring and sensor installation, often requiring 1–2 full days. The difficulty level is moderate for manual installations, but automatic systems require more experience and comfort working with electrical components.
The cost varies widely depending on materials. A basic DIY gate may run $300–$1,200, while an automatic gate opener can range from $400–$2,000. In Orange County, professional installation can run anywhere from $1,500–$6,000+, depending on gate size, material, and terrain. This is why many homeowners searching “aluminum fence installation near me” also consider combining both fence and gate installation into one project to save on total costs.
Step-by-Step: How to Install a Driveway Gate
Step 1 — Measure Your Driveway Opening
Accurate measurements are the foundation of a successful installation. Start by measuring the width between the two points where your gate posts will sit. This ensures the gate panels will open and close properly without dragging or hitting obstacles. Pay special attention to slopes — common in Orange County homes — because even a slight incline can affect the way your gate swings. If your driveway slopes upward, you may need rising hinges or a sliding gate.
Step 2 — Mark & Dig Your Post Holes
Once measurements are done, mark the locations for the posts, ensuring they are spaced precisely according to your gate’s hinge requirements. Dig holes deep enough for strong anchoring — at least 30 inches, and up to 36 inches in softer soil. Orange County’s terrain varies, and in rocky or sandy areas, posts need deeper footings for stability.
Many homeowners ask, “What if my soil is rocky?” In that case, digging may take longer, and you may need to break up rocks with a digging bar or adjust hole placement slightly while keeping proper alignment.
Step 3 — Set the Gate Posts in Concrete
With holes ready, place the posts inside and slowly fill around them with mixed concrete. Continuously use a level to ensure each post remains perfectly straight as the concrete fills. This step is critical, as leaning posts will cause gate alignment issues later. Once the concrete is poured, allow 24–48 hours for curing.
If your posts lean after installation, it often means they shifted in wet concrete — a common mistake. In this case, you may need to reset the post for long-term stability. Avoid skipping concrete entirely; driveway gates require strong foundations to withstand weight and wind.
Step 4 — Install the Hinges & Hang the Gate
Once the posts are fully cured, attach hinge brackets to the gate frame and secure them to the posts. Having a second person assist with lifting will prevent injuries and ensure the gate stays level during installation. Once the gate is hung, open and close it several times to test smooth movement, ensuring no sagging or dragging occurs.
If your gate begins to sag shortly after installation, the most likely issue is uneven hinge placement or insufficient post depth.
Step 5 — Install an Automatic Gate Opener (Optional)
For many Orange County homeowners, an automatic driveway gate adds convenience, security, and a modern feel. Installation includes mounting the opener arm or sliding mechanism, wiring safety sensors, connecting the opener to power or a solar panel, and programming open/close limits.
Homeowners frequently ask, “Is it safe to install my own automatic gate opener?” Yes — but only if you follow safety guidelines and verify that sensors are properly aligned. Improper installation can cause injury or property damage, so if you’re uncertain, searching “aluminum fence installation near me” is a smart next step to find a qualified technician.
Troubleshooting Common Problems
Even with a careful installation, driveway gates can develop issues over time, especially if posts settle or hardware loosens. One of the most common problems homeowners face is a gate that won’t close properly. This often happens when the posts are no longer level, causing the hinges to sit at an angle. Another frequent issue is gate panels rubbing against the ground, usually due to soil erosion or inadequate ground clearance during installation. If your gate begins to drag, inspect the hinges and mounting brackets to ensure none have loosened or shifted.
Automatic driveway gates come with their own set of challenges. A gate that stops halfway or refuses to respond may have a low battery, debris clogging the track, or misaligned safety sensors. In some cases, weather conditions in Orange County — such as heat expansion or moisture — can affect metal components and cause operational issues. Always begin troubleshooting by checking power sources, tightening hardware, and clearing obstructions. If problems persist, it may be time to consult a professional by searching “aluminum fence installation near me” or contacting a local gate specialist.
DIY vs. Professional Installation: Which Is Better?
DIY is ideal for smaller, lighter gates and for homeowners comfortable with tools and measurements. However, professional installation is recommended for heavy gates, automatic systems, sloped driveways, HOA-regulated communities, and homeowners wanting long-term durability without trial and error.
Many Orange County residents simply search “aluminum fence installation near me” to find licensed installers who can handle the full project — from post setting to opener programming.
Conclusion
Installing a driveway gate yourself is an achievable project when you follow each step carefully and use reliable materials. Whether you’re adding security, enhancing curb appeal, or upgrading your aluminum fencing, a well-installed driveway gate is a valuable improvement for any Orange County home. If you ever feel unsure about the process or want a flawless result, a local expert is just a search away.
FAQs
Can I install a driveway gate on a sloped driveway?
Yes. For upward slopes, a sliding gate or rising-hinge gate works best. Swing gates may require custom hinge adjustments.
How deep should driveway gate posts be?
Most driveway gate posts should be set 30–36 inches deep with concrete for proper stability, especially in soft or sandy Orange County soil.
Do I need permits to install a driveway gate in Orange County?
Some cities and HOAs require permits for fencing and gate installations. Always check local regulations before digging or setting posts.
Can I attach a new gate to an existing aluminum fence?
Absolutely. Aluminum is one of the best materials for automated driveway gates because it’s lightweight, reducing strain on motors and hinges. This results in longer-lasting automation systems and smoother daily operation.
Is it safe to install my own automatic gate opener?
It can be safe if you follow all instructions carefully and install required safety sensors. If you’re unsure, consider hiring a professional installer.
Why is my driveway gate sagging after installation?
Gate sagging often results from uneven hinge placement, shallow post installation, or loose mounting hardware.
What is the best material for driveway gates in coastal Orange County?
Yes. Modern aluminum fences can be built with full privacy slats or panels, making them an excellent alternative to wood or vinyl privacy fencing. These styles are especially popular for side yards and backyards in Orange County.